So I have been MIA for quite a while.
Big changes happened over the last four months and it has kept me busier than I could ever imagine.
I wish I could say that I will keep this blog completely up to date, but let's be realistic - full time job, mommy, wife and student. Life is about to get even crazier.
But in the mean time, I wanted to share with you all a little gift I gave to my kids daycare teachers. You know, holidays come and each time I am sitting there thinking - what the heck do I give them? If I was on their receiving end, what would I like to receive?
And so here is what I made -
So I bought a variety of gift cards, wrapped them individually, and created this Christmas tree. I left instructions for the teachers and staff members to select one rectangle from the tree. When they unwrapped it, they each got a gift card.
Now, I know it can get pricey so I selected reasonable places with cards in a $10-15 dollar range and they were for local restaurants. And I am sure you are thinking, 14 giftcards?! Well, they have a quite a few employees - some part-time and some full time and the reality of it is, they all take care of my children. I will say that at our daycare, they truly mix and mingle among the rooms. The kids interact with not only their main full time teacher, but part time assistant teachers as well. I think this has been beneficial because my children are constantly learning how to interact with a variety of adults, and not cling to just one in the daycare setting. Plus I could not forget the cafeteria or office staff. Each and every one of them have taken the time to know and love my babies, so it was the least I could do for them.
The nice thing about this was that I did not pick what went to each person, it was a surprise. And they didn't know what they were receiving, especially since it was a mixture of places.
I think something like this makes for an easy gift, and a usable gift. Don't get me wrong, cute mugs and pretty pens are nice, but when it is something that they can take back and use on their family, or for their daily lunch run, then I think they may appreciate it differently. Plus, it eliminated me stressing over what to buy each individual.
I think - if the cost is an issue - this is also something that can be done in a group with other parents. Such as everyone chipping in an set amount so that enough gift cards can be purchased.
I hope that something like this allowed them to take their family or friends out to enjoy a small meal, coffee, or dessert - and all they had to worry about was picking out what would satisfy their craving - since the purchase was on us!
Showing posts with label Get Your Craft On. Show all posts
Sunday, January 17, 2016
Giftcards Galore
Labels:
Christmas,
Christmas gift,
Christmas tree,
Get Your Craft On,
Gift,
Gift cards,
Gift idea,
Giftcards,
Superwoman Says,
Teacher gift,
Teacher present
Monday, July 20, 2015
Making Crayons for Toddlers
So majority of us have seen on Pinterest and beyond how we can take broken crayons and melt them into new crayons. But how many of you have actually tried it? Well I did... Just for fun.
My son wants to color when my daughter does, but then the crayon easily finds its way into his mouth and I take it away and of course he becomes upset. I try to look for any and all small broken pieces each time to ensure he isn't letting his curiosity get him into trouble, but I hate to throw out crayons that still have potential that my daughter is using. I know I can buy larger, thickers crayons for him, but he also likes to use what big sister is using. So when a Pinterest find showed a possible solution, why not give it a try? While you see many bloggers make cute shapes like hearts and stars, I was looking to make a large basic crayon that works for a curious toddler.
Thanks to Intimate Weddings, they had easy instructions and great pictures to go along. Because of this, I am not going to put all the steps or pictures as well. In their case, they were making them for favors at a wedding or for the children's table, but for me, I just wanted to make a giant crayon that my son could not put in his mouth all at once.
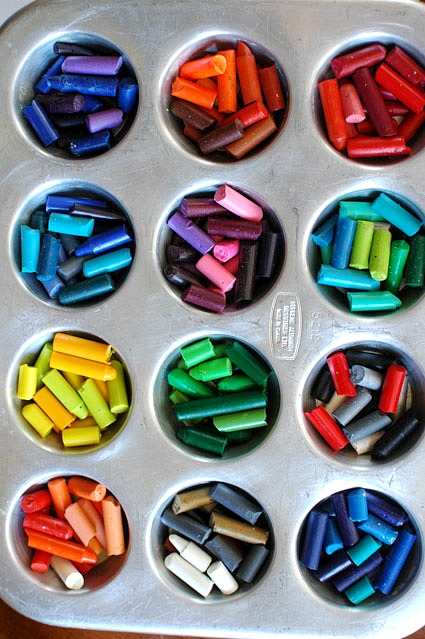
I used a large muffin pan like theirs, and because of my OCD tendencies, I did not group or mix a hundred different colors into each hole. I grouped them generically - reds, blues, greens, etc.
I set the oven to 250 degrees, but quickly learned that is not hot enough for melting them in this size pan and with that many crayons per hole. I found 275 degrees worked much better for me and I melted them for about 12 minutes, keeping a close eye the entire time.
Once I removed them, I let them cool for a bit and then placed them into the freezer. In my opinion, that was a mistake I made, as a few of mine cracked. My other mistake was that I did not make them thick enough. While I had a lot of little pieces to use, I did not have enough of each color grouping to make them thick. In the end, I found mine way too thin for a one-year old, who will surely drop them on the tile.
So I took the newly formed crayons that I had made, put them back in the tray and this time, I placed one color on the bottom but a different color on top. For example, I put the yellow crayons wafer back into the muffin pan and then put the green wafer on top, so they would melt together into a thicker crayon. I figured that this will make them super thick.
Again, 275 for about 12 minutes. This worked perfectly. Cooled them first and then used the refrigerator instead. Here are some photos of my super thick crayons that are easy for my one year old son to grasp and use, plus when they hit the floor they don't crack!
I hope you find this helpful if you have a small one that wants to color like the big kids, but also has those everything-goes-in-the-mouth and butter-finger tendencies. Even my daughter liked using these, as I rolled out a large piece of paper on the floor and let them color to their hearts content.
So next time you have those small chunks of random crayons, give them a second chance and try melting your own!
My son wants to color when my daughter does, but then the crayon easily finds its way into his mouth and I take it away and of course he becomes upset. I try to look for any and all small broken pieces each time to ensure he isn't letting his curiosity get him into trouble, but I hate to throw out crayons that still have potential that my daughter is using. I know I can buy larger, thickers crayons for him, but he also likes to use what big sister is using. So when a Pinterest find showed a possible solution, why not give it a try? While you see many bloggers make cute shapes like hearts and stars, I was looking to make a large basic crayon that works for a curious toddler.
Thanks to Intimate Weddings, they had easy instructions and great pictures to go along. Because of this, I am not going to put all the steps or pictures as well. In their case, they were making them for favors at a wedding or for the children's table, but for me, I just wanted to make a giant crayon that my son could not put in his mouth all at once.
I used a large muffin pan like theirs, and because of my OCD tendencies, I did not group or mix a hundred different colors into each hole. I grouped them generically - reds, blues, greens, etc.
I set the oven to 250 degrees, but quickly learned that is not hot enough for melting them in this size pan and with that many crayons per hole. I found 275 degrees worked much better for me and I melted them for about 12 minutes, keeping a close eye the entire time.
Once I removed them, I let them cool for a bit and then placed them into the freezer. In my opinion, that was a mistake I made, as a few of mine cracked. My other mistake was that I did not make them thick enough. While I had a lot of little pieces to use, I did not have enough of each color grouping to make them thick. In the end, I found mine way too thin for a one-year old, who will surely drop them on the tile.
So I took the newly formed crayons that I had made, put them back in the tray and this time, I placed one color on the bottom but a different color on top. For example, I put the yellow crayons wafer back into the muffin pan and then put the green wafer on top, so they would melt together into a thicker crayon. I figured that this will make them super thick.
Again, 275 for about 12 minutes. This worked perfectly. Cooled them first and then used the refrigerator instead. Here are some photos of my super thick crayons that are easy for my one year old son to grasp and use, plus when they hit the floor they don't crack!
I hope you find this helpful if you have a small one that wants to color like the big kids, but also has those everything-goes-in-the-mouth and butter-finger tendencies. Even my daughter liked using these, as I rolled out a large piece of paper on the floor and let them color to their hearts content.
So next time you have those small chunks of random crayons, give them a second chance and try melting your own!
Labels:
Arts and crafts,
Big crayon,
Broken crayons,
Crayons,
Get Your Craft On,
Melting crayons,
Reusing crayons,
Superwoman Says,
Toddler crayons
Monday, June 15, 2015
Jellyfish for Under the Sea Party
So my big girl had a Little Mermaid themed party and in the
middle of this huge desert we live in, I wanted to bring the sea to her. So I of course turned to Pinterest for some ideas on décor
and saw these jellyfish to hang. I just had
to do it for her party.
There are lots of different ways to make the jellyfish, if you haven't yet Googled or looked to Pinterest for inspiration - here are a few things I saw...
Now I did not follow a single idea all the way. I had a few tricks up my own sleeve and I made a few changes along the way and I think they turned
out awesome. I will try to give clear steps or at least good pictures along the way, incase you want to create an under the sea world for your own celebration in the future.
Here are the items that I used:
Shower Caps
Tissue Paper
Scissors
Stapler
First – I went to my go to - DollarTree - to buy the shower caps and tissue paper. I got lucky that they actually sell the caps in multiple colors in large packs - pink, purple and clear. And the pastel tissue paper matched perfectly.
I took two sheets of tissue paper, put them on top of each other and created a (not so perfect) spherical structure with them. (Basically a big tissue paper puff ball.) I put the shower cap over the sphere and fluffed the paper to fill the space.. Top of the jellyfish – done!
3.
Next, I made the
tentacles of the jellyfish.
I simply took a sheet of tissue paper (or a couple of sheets to be more efficient), contrasting in color to the top of the jellyfish. I folded the papers in half multiple times. (This you may need to play with to determine the best length and width of the tentacles you want on your jellyfish.) I took my scissors and rounded the edges to make sure I wasn't ending up with pointed tentacles.
5.
6. 
7.
I unfolded, took my scissors and cut a spiral through the papers, winding from the outside to the center. I made them just over an inch wide to make sure the paper would not rip by being too thin in width. Once I was done, unwound the layers of tentacles. These were really long so I trimmed them. What you will find is that the spirals made closer to the center are so much better than the outer edge of the spiral, so I cut off the straighter portion and kept the curlier portion.
I took each tentacle, and folded the edge a few times to give it a thicker portion to be secured to the jellyfish head. I did not want them ripping off easily since the tissue paper is so thin. I stapled each tentacle to the shower cap, just past the elastic lining. I only put about 8 tentacles on each. I alternated, putting two varying lengths on them, just to give it a fuller effect while hanging. And tada - Jellyfish fit for my princess!
8.
9. 
Last thing - I hung these from the ceiling. At first I was not so sure how to go about it, because I did not want the shower cap to tear if I poked a string through it to hang it. Well - I came up with an awesome idea to use poster tack. If you are not a teacher, then you may not know what it is exactly but you can find it at Walmart, CVS, Walgreens, Michaels, Hobby Lobby, etc.
I have it in blue but there are different colors and brands, and it is just a simple putty that you use to hang stuff to walls. It beat me tearing, flattening, smushing or damaging those jellyfish I worked so hard on - and no extra holes in my wall from push pins or staples. I rolled up a small amount to form a ball for each jellyfish, placed it on the top of the jellyfish head, and then pushed it up against my ceiling. Let me tell you, these hung for days! Well after all that work decorating, I was in no rush nor did I have the energy to pull it all down right away (so we lived under the sea for a few days). Of course, I should have pulled it down sooner, as it left a small oil stain where it had been, but nothing big that people will actually notice when they visit my house. I probably hung about 8 of the jellyfish from the ceiling, along with using varying shades of twisted green crepe streamers for seaweed from the ground up, and printing and hanging various Little Mermaid characters along the wall. I was thoroughly impressed with what my hard work and efforts produced for my baby girl.
And that is how I brought the sea to my home for my daughter's birthday.
I simply took a sheet of tissue paper (or a couple of sheets to be more efficient), contrasting in color to the top of the jellyfish. I folded the papers in half multiple times. (This you may need to play with to determine the best length and width of the tentacles you want on your jellyfish.) I took my scissors and rounded the edges to make sure I wasn't ending up with pointed tentacles.
5.
7.
I unfolded, took my scissors and cut a spiral through the papers, winding from the outside to the center. I made them just over an inch wide to make sure the paper would not rip by being too thin in width. Once I was done, unwound the layers of tentacles. These were really long so I trimmed them. What you will find is that the spirals made closer to the center are so much better than the outer edge of the spiral, so I cut off the straighter portion and kept the curlier portion.
I took each tentacle, and folded the edge a few times to give it a thicker portion to be secured to the jellyfish head. I did not want them ripping off easily since the tissue paper is so thin. I stapled each tentacle to the shower cap, just past the elastic lining. I only put about 8 tentacles on each. I alternated, putting two varying lengths on them, just to give it a fuller effect while hanging. And tada - Jellyfish fit for my princess!
8.
Last thing - I hung these from the ceiling. At first I was not so sure how to go about it, because I did not want the shower cap to tear if I poked a string through it to hang it. Well - I came up with an awesome idea to use poster tack. If you are not a teacher, then you may not know what it is exactly but you can find it at Walmart, CVS, Walgreens, Michaels, Hobby Lobby, etc.
I have it in blue but there are different colors and brands, and it is just a simple putty that you use to hang stuff to walls. It beat me tearing, flattening, smushing or damaging those jellyfish I worked so hard on - and no extra holes in my wall from push pins or staples. I rolled up a small amount to form a ball for each jellyfish, placed it on the top of the jellyfish head, and then pushed it up against my ceiling. Let me tell you, these hung for days! Well after all that work decorating, I was in no rush nor did I have the energy to pull it all down right away (so we lived under the sea for a few days). Of course, I should have pulled it down sooner, as it left a small oil stain where it had been, but nothing big that people will actually notice when they visit my house. I probably hung about 8 of the jellyfish from the ceiling, along with using varying shades of twisted green crepe streamers for seaweed from the ground up, and printing and hanging various Little Mermaid characters along the wall. I was thoroughly impressed with what my hard work and efforts produced for my baby girl.
And that is how I brought the sea to my home for my daughter's birthday.
Labels:
Ariel birthday,
Ariel party,
Decor,
Decoration,
Get Your Craft On,
Jellyfish,
Jellyfish decoration,
Little Mermaid,
Little Mermaid decoration,
Party decor,
Party ideas,
Superwoman Says,
Under the Sea
Sunday, April 5, 2015
Easy Easter Bouquet
Ok... the other day I posted that I was going to try the Easter bouquet that I found online. So I am here to share my results with you. Exciting right? Well for me it was, because this was a busy and tiring week at work, but I managed to use my evenings wisely after the kiddos bedtime. Took me a two evenings to do it, not because its difficult, but because I also wanted to go to sleep at a decent time. And I made a few changes. Overall, I think it turned out well.
These were the supplies I collected:
(based off of Ms. Not So Perfect's directions-
First, I cut out leaves for each of the flowers. Nothing fancy. I googled a generic leaf design, printed it on the cardstock and cut it out. Prior to putting the skewer through the holes found at the bottom of the egg, I simply poked it through my leaf first, and then the egg.
Once inserted, I filled the egg with candy. I was able to fit one small candy bar and one sixlet in each egg with careful maneuvering. I had to be extra careful to make sure the skewer did not go through any of the chocolates.
I did attempt to use a regular vase to arrange the flowers. But I was making 30 of them, and it was getting difficult to rearrange to make everything fit. I didn't want to run out and buy a new vase for this project. So, I got crafty with some recycling. Luckily I had saved a baby formula container that worked perfectly. I made it nice by gluing on some ribbon on the ribbed edge along the top, and made a bow.
Here is the final product. Hopefully the teachers enjoyed their bouquet and took a few home to enjoy.
These were the supplies I collected:
(based off of Ms. Not So Perfect's directions-
- Pack of plastic eggs
- Skewers
- Ribbon
- Vase
- Candy
- Recycled formula box for a vase
- Glue gun
- Popcorn
- Zippered Baggies
- Green Cardstock
First, I cut out leaves for each of the flowers. Nothing fancy. I googled a generic leaf design, printed it on the cardstock and cut it out. Prior to putting the skewer through the holes found at the bottom of the egg, I simply poked it through my leaf first, and then the egg.
Once inserted, I filled the egg with candy. I was able to fit one small candy bar and one sixlet in each egg with careful maneuvering. I had to be extra careful to make sure the skewer did not go through any of the chocolates.
Here is the final product. Hopefully the teachers enjoyed their bouquet and took a few home to enjoy.
Thank you Ms. Not So Perfect for the project!
Sunday, March 29, 2015
Build an Easter Bouquet
So - I am trying to get better at sending little things here and there to the daycare for the teachers. Being a teacher myself, I know that things we do often go unnoticed. And I want to make sure the teachers know how much I appreciate them - they play, hug, clean, feed, teach and love my children. They spend 5 days a week, from 8 to 5, with my precious babies. I know they get paid because it is their job, but there is nothing wrong with showing them a bit of appreciation for all that they do. Personalized gifts would be great, but the teachers move around, share the kids, help one another - so while I could give to specifically the teachers that lead each classroom, I know there are many individuals that are helping with giving my babies the best care possible.
With Easter around the corner, I spotted this cute Easter bouquet on pinterest and traced it back to Ms Not So Perfect and her blog.
I thought making it would be fun. I would like to fill the eggs with a little candy inside. I figured I could make it big enough so that there is a "flower" for each of the teachers at the daycare. Each could pick an egg of their liking - and open it up for a surprise. What do you think?
Heading to the store tomorrow... I will let you know what I come up with!
Hopefully it's not a fail!!
With Easter around the corner, I spotted this cute Easter bouquet on pinterest and traced it back to Ms Not So Perfect and her blog.
I thought making it would be fun. I would like to fill the eggs with a little candy inside. I figured I could make it big enough so that there is a "flower" for each of the teachers at the daycare. Each could pick an egg of their liking - and open it up for a surprise. What do you think?
Heading to the store tomorrow... I will let you know what I come up with!
Hopefully it's not a fail!!
Labels:
Bouquet,
Easter bouquet,
Easter Bunny,
Easter eggs,
Eggs and candy,
Get Your Craft On,
Superwoman Says
Saturday, March 28, 2015
Gettin' Crafty
So - I love crafts. My mom always had us doing crafts. It was fun. It made me creative. And now I am having fun looking for things to do for, and with, my kids, and for myself. I think it's important. So I hope some of these things I find, try and do gives you some motivation to pull out the glitter and glue, paintbrushes, or collect the random stuff and put it to good use in art. Enjoy!
Subscribe to:
Posts (Atom)